The Purge button allows clearing a drawing of unnecessary data that are not used but are nevertheless stored in the drawing.
Quick Access Panel: ![]()
Ribbon: Editor -> Edit -> Purge
Menu: Tools -> Modify -> Purge
Unused objects, blocks, dimension and text styles, layers, linetypes can be deleted. Deleting unused objects decreases the size of the file. The fulfilled deletion can be canceled after closing the dialog box Purge with the help of the command Undo or the hotkey Ctrl+Z. If the object is used in the drawing it can't be purged.
Note: when a file is opened ABViewer standard linetypes CENTER, ISO dash, ISO dot, ISO dash dot, ISO dash double-dot, ISO dash triple-dot, ISO dash long gaps are automatically added. If the drawing is closed without saving the listed linetypes aren't saved into the file.
The command Purge calls the dialog box Purge which shows all the named objects of the current file. The objects are presented as a tree like structure in this dialog box. The lists of deletable and undeletable elements are formed separately with the help of the correspondent options.
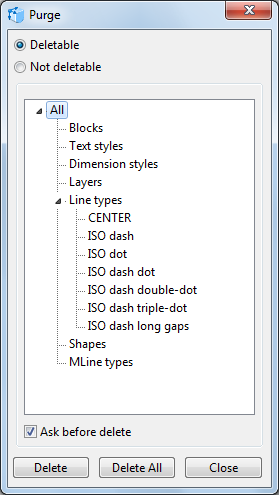
•The Deletable radio button allows to see the unused elements stored in the drawing that can be deleted. The black triangle in front of the group name means that this group has nested objects. To expand the list click on this black triangle with the left mouse button or double left click on the name of the group.
To delete an element select it in the list with the left mouse key and press Delete in the dialog box Purge. If the option Ask before delete is on you'll be asked to confirm the deletion.
To delete all the elements - nested ones as well - use the button Delete All. If the option Ask before delete is on you'll be asked to confirm the deletion.
This option allows you to make sure you don't occasionally or by mistake delete the element you do wish to have in the drawing. It can be especially useful if you choose deletion of all unused elements at once. In this case you will be consecutively asked to confirm the deletion of each of the deleted elements:
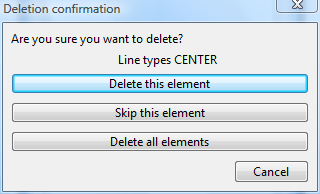
oDelete this element. The command deletes the element the name of which is in the confirmation dialog box. In the current example it is the linetype CENTER. The confirmation request appears after deleting each deletable element.
oSkip this element. The element the name of which is in the confirmation dialog box will not be deleted. The command will switch to the next element.
oDelete all elements. This command deletes all deletable elements including nested objects.
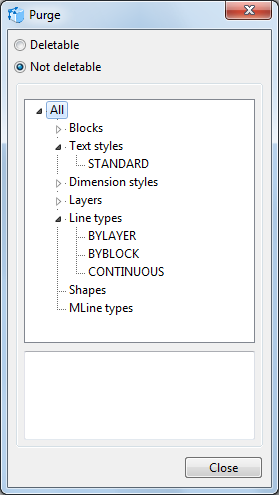
•The Not deletable radio button lists the elements that are used in the drawing and cannot be deleted. After selecting the object with the left mouse button the information about the reason why this elements can't be deleted is displayed under the tree-like structure.
Go to ABViewer